
 Today I would like to walk you through my adventure to draw and cut the ice cream cone on this card using only my Cricut Expression. But first, I would like to say "Thank you" to Provocraft and the moderators of the Cricut message board for deleting my request for assistance with gel pens from their board. I appreciate the lack of customer service that goes into just about every issue I have had with Provocraft products inspiring me to solve problems on my own and create much more than solutions, but works of art. I would like to believe THAT is the reason that Provocraft neglects me as a customer... not because they are greedy and require that ONLY their products be discussed on the message board while failing to establish cooperative relationships with companies that work to improve upon their products... no, let's believe it's because they are trying to inspire our greatness through poor business practices and that their bottom line is not their only concern. And in no way does the fact that they produce the only product of its kind, have anything to do with their lack of service... nope, in the name of ART, I am believing that I would be treated the EXACT same way if Provocraft had competition (i.e. non-computer based electronic die cutting system). I COULD believe that!!! ;) So thank you Provocraft for being a horrible company with the best product and making me a better artist because of it.
 NOW, here's what I discovered about using the gel pens: I have two gel pen holders, also called a gel pen housing. They look very similar to the blade housing in my Cricut Expression but hold mini gel pens that I got at Staples and mini gel pens I got from Cri-Kits.com. So the project for today was figuring out how to draw with those pens, but then go back and cut the image out without cutting any part of the drawn image. I chose the Indie Art cartridge to use today because I LOVE the images on this cartridge and none of the images are really detailed. I figured I needed to keep things as simple as possible since Provocraft/Cricut told me in no uncertain terms that they would not be of any help to me. 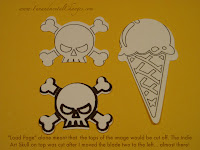 So I chose the ice cream cone and the skull images. I figured out VERY quickly that drawing the image with the gel pen, and simply cutting it out isn't so simple. The technique I'm describing below is ONLY for a drawn shape that you want to cut out in the shadow feature. Cutting the blackout of a drawn image, while MUCH simpler, doesn't really work with gel pens because the blade just follows the exterior gel drawn lines. The reason that the blackout cut works so well with the Cricut markers (BTW... did I mention that technique is MUCH simpler?) is because the markers draw a thick line while the blade cuts a thin line so the ink is still visible on your work when you're done. But let me show you how to cut an image you drew with gel pens....
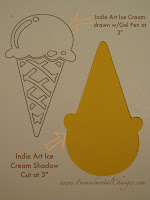
 So I chose the ice cream cone and the skull images. I figured out VERY quickly that drawing the image with the gel pen, and simply cutting it out isn't so simple. The technique I'm describing below is ONLY for a drawn shape that you want to cut out in the shadow feature. Cutting the blackout of a drawn image, while MUCH simpler, doesn't really work with gel pens because the blade just follows the exterior gel drawn lines. The reason that the blackout cut works so well with the Cricut markers (BTW... did I mention that technique is MUCH simpler?) is because the markers draw a thick line while the blade cuts a thin line so the ink is still visible on your work when you're done. But let me show you how to cut an image you drew with gel pens....
I first drew the ice cream cone with black gel pen. The pic here shows the lines that are drawn with the gel pen and then the line that was cut when I cut the same image with the "Shadow" feature depressed. You can see that the shadow cone is slightly larger than the gel pen drawn cone next to it. My directions to cut a shadowed image drawn with a gel pen are for 1.5" images and 3" images (since those were the two sizes I worked on today. Other sizes will require a little trial and error for step 2, see below). Click on pics to enlarge.
Step 1: On your Cricut, exchange the blade housing with the pen housing loaded with your favorite pen per the manufacturer's instructions for the pen housing. Once the pen housing is in place, carefully load your paper. For this technique, make sure your paper is in the top right corner of your mat.
Step 2 for 1.5" image: hit the left arrow on your Cricut directional keys once.
Step 2 for 3" image: hit the left arrow on your Cricut directional keys once and the down arrow twice.
Step 3: Select your image and draw per the manufacturer's instructions for pen housing use. Typically this will require that you lower the speed and pressure on your Cricut. When drawing is complete, DO NOT UNLOAD YOUR MAT.
Step 4: Carefully change the pen housing to the blade housing and depress the "load paper" button again. A sticky note can be used to cover your work while you remove the pen housing so that your image is not accidentally marked with the pen. The sticky note can then be removed before you insert the blade housing. Since the mat is still in the machine, the blade will now return to the top right corner of the mat after you hit the load paper button. Make sure that your speed and pressure are returned to the desired settings for cutting your image.
Step 5: Select the "Shadow" feature for the image you drew and hit cut. You're done. Here's what mine looked like....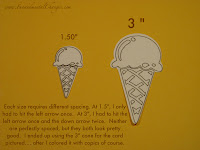

I hope this explanation helps everyone else with their Cricut Gel Pen Projects, cuz you won't find help from Cricut.com or Provocraft.
Comments