How to Upload Gypsy Cut Files To Your Gypsy

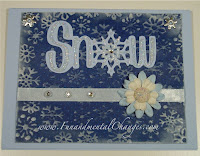
Well... Today was the big day for the Provo Craft Gypsy! Provo Craft FINALLY provided the Cricut Design Studio compatibility and now we also have the added benefit of sharing Gypsy cut files... but it was at a price. I will get to that in a later post. In honor of this occasion though, I will be adding my Gypsy cut files to my blog for everyone to use. You will find my cut files in the top right corner of my blog marked *NEW (at the top of the side bar). The instructions on how to download at the bottom of this post. I hope you all enjoy them... they've been a long time coming. The featured pic here is the "welded Snow" file. It turned out BEAUTIFUL!

DOWNLOAD INSTRUCTIONS

For those of you who already own the Gypsy, here are the instructions. There is no conversion needed because these files are only .gypsy files. To save them:
1.) Connect your gypsy to your computer, turn it on and open Gypsy Sync on your computer.

2.) Once the Gypsy Sync Program has searched for an update and found none, it will open up a file window. Click on the + next to "Gypsy" and then click on "designs". A list of files that are currently saved on your Gypsy should appear. Minimize the Gypsy Sync screen.

3.) From the side bar on this blog, click on the file you would like to download. MediaFire will open. Click download and then save.

4.) From that drop-down menu, find Gypsy Sync and highlight it as the location to save the file.

5.) Once the file is saved, maximize the Gypsy Sync Screen and see your new file saved in the list. In order to see the new file on the list in your Gypsy, you may have to power your Gypsy down and then turn it on again to see the new file added.
6.) If you do not see the file in the list, click on the "Upload Files to Gypsy" button located on the bottom lower-left of the Gypsy Sync screen on your computer. Choose the file you would like to upload from the list by clicking it once to begin the upload.


GOOD LUCK everyone and I hope you enjoy these cut files.
**Cartridges Used: Don Juan, Christmas Noel
UPDATE: As of September 2010, Gyspy Sync was replaced with Cricut Sync. For UPDATED upload instructions click HERE. Also, all of my cut files are now found in the right margin of this blog titled "FREE Gypsy Cut Files".

Comments

CathieForman said…
Wow, this is great. I love the snow that you made. I hope I can figure all this out. Thanks for sharing your files.
Magoo said…
Wonderful instructions Fitter!! Thank you for your generosity~I loved your skull card and now I have it on my Gypsy!! how awesome :): ) you rock!
Anonymous said…
This is great! I was hoping someone would be posting instructions. Thank you so much!! Lee
FitterTwit said…
Thanks so much everyone.... please let me know if you have any problems with my instructions. And I'm so glad that you're liking the images! :)
Shelley said…
This is awesome Thank you for sharing your hard work and making it alot easier for those of us not computer savy!
Shells
Lindalee622 said…
Well I will be darned, but I cannot get this to download and save into my Gypsy sync files.
Grrrrrrrr, what am I doing wrong?
I feel that I am doing exactly what you have posted, but for some reason it is not showing up in my syce folder at all or on my gypsy even after many tries.
FitterTwit said…
It won't show up on your gypsy until you turn it off and then turn it back on... also, the capitalized files appear before the lower case files so be sure that your are scrolling COMPLETELY through the list. Good luck and let me know. Thanx for posting! :)
Does this work with a mac or pc b/c I have it connected to the mac and gypsy sync does not open up. Can you pls help me.
FitterTwit said…
Be sure that you have the latest version of Gypsy Synch. If you do not, you will have to completely remove the first version BEFORE uploading the newest version (being sure that you select the MAC option). You can check out installation notes here: http://www.cricut.com/gypsy/updates.aspx
I hope that helps! :)
Anonymous said…
So when I use a cut file that you shared on a project, do I reference your blog when I post my work so people know that you created the cut file? If so, how do you keep all your cut files organized so you can give proper credit?
FitterTwit said…
Anonymous...thank you for asking. Please just mention my blog. As far as my cut files being organized, they are posted in the left margin of my blog under FREE cut files. Thanx again! :)

Past 7 Days....

Gorgous Leaves Bundle Revisited

Yestday's Freebie Friday on a Monday projects were so fun and this set is SO BEAUTIFUL in it's simplicity!  It reminds me of a long-retired stamp set from Stampin Up!.  I was inspired to re-create the projects that I made with it once upon a time.  So here we go.... SIMPLE projects when you need a quick "hello" or an even quicker heartfelt sympathy card: I was DEFINITELY on a Bumblebee and Cajun Craze kick yesterday!  I can't stop/won't stop!  LOL!  To be fair... I had extra leaves die cut and didn't want anything to go to waste!  A quick speckle backdrop in Bumblebee then a quick "hello" greeting from the Biggest Wish in Cajun Craze with the Cajun Craze leaf popped up on a Basic White cardbase.  PERFECTION! Okay, as with yesterday's projects, the sentiment is from the recently retired SAB Delicate Dahlia's set, but you could use ANY sympathy sentiment you have in your stash.  Unlike in the past when I had to mask off the center rectangle...

RAWR!

Feelin a little animal!!!  It seems as if being laid up with back pain has it's perks!!!  RAWR!  This fun nail art was inspired by my upcoming Fun With Alcohol Ink Class on March 3rd at Craft Fusion (class starts at 1 p.m.), check out what we'll be making: In fact... if you loved the nail art above, you might want to consider signing up for this class [hint, hint].  For this class we'll be creating this ADORABLE notebook using various alcohol inks.  You're not going to want to miss this!  Along with learning how to assemble our own notebook using The Cinch and Zutter products, we will also be using alcohol inks to customize our project.  Join us and learn how to color stamped images using alcohol ink markers giving your projects depth and dimension.  Please bring your basic tool kit and alcohol ink markers (any brand) for this instruction.  There are markers to rent, but rental markers are limited so the sets will be available on a first c...

Got My Healthy Game On.... YO!

So, I've found some new fun in fitness.... the Wii! First of all, let me start by saying that when you change your lifestyle from sedentary to active, it is important to incorporate changes that will stick. And for me... this Wii will be sticking around for quite some time! The fact that this video game is played by your body movements alone should be winning the Pulitzer Prize for turning around the obesity epidemic in this country by introducing physical activity BACK into our kids lives! Whew! That was a super run on sentence! hahahaha! Earlier this week I got the balance board for the Wii. It included a game called Wii Fit. I have read quite a few reviews on the Wii Fit complaining that it doesn't include full exercise segments. In my opinion this game is lacking nothing because it is simply introducing fun exercise into our inactive lives and into our child's life . In a day and age when kids are typically found on their bottoms in front of a video game, eyes seemingly...