How to Upload Gypsy Cut Files To Your Gypsy

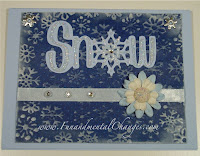
Well... Today was the big day for the Provo Craft Gypsy! Provo Craft FINALLY provided the Cricut Design Studio compatibility and now we also have the added benefit of sharing Gypsy cut files... but it was at a price. I will get to that in a later post. In honor of this occasion though, I will be adding my Gypsy cut files to my blog for everyone to use. You will find my cut files in the top right corner of my blog marked *NEW (at the top of the side bar). The instructions on how to download at the bottom of this post. I hope you all enjoy them... they've been a long time coming. The featured pic here is the "welded Snow" file. It turned out BEAUTIFUL!

DOWNLOAD INSTRUCTIONS

For those of you who already own the Gypsy, here are the instructions. There is no conversion needed because these files are only .gypsy files. To save them:
1.) Connect your gypsy to your computer, turn it on and open Gypsy Sync on your computer.

2.) Once the Gypsy Sync Program has searched for an update and found none, it will open up a file window. Click on the + next to "Gypsy" and then click on "designs". A list of files that are currently saved on your Gypsy should appear. Minimize the Gypsy Sync screen.

3.) From the side bar on this blog, click on the file you would like to download. MediaFire will open. Click download and then save.

4.) From that drop-down menu, find Gypsy Sync and highlight it as the location to save the file.

5.) Once the file is saved, maximize the Gypsy Sync Screen and see your new file saved in the list. In order to see the new file on the list in your Gypsy, you may have to power your Gypsy down and then turn it on again to see the new file added.
6.) If you do not see the file in the list, click on the "Upload Files to Gypsy" button located on the bottom lower-left of the Gypsy Sync screen on your computer. Choose the file you would like to upload from the list by clicking it once to begin the upload.


GOOD LUCK everyone and I hope you enjoy these cut files.
**Cartridges Used: Don Juan, Christmas Noel
UPDATE: As of September 2010, Gyspy Sync was replaced with Cricut Sync. For UPDATED upload instructions click HERE. Also, all of my cut files are now found in the right margin of this blog titled "FREE Gypsy Cut Files".

Comments

CathieForman saidā€¦
Wow, this is great. I love the snow that you made. I hope I can figure all this out. Thanks for sharing your files.
Magoo saidā€¦
Wonderful instructions Fitter!! Thank you for your generosity~I loved your skull card and now I have it on my Gypsy!! how awesome :): ) you rock!
Anonymous saidā€¦
This is great! I was hoping someone would be posting instructions. Thank you so much!! Lee
FitterTwit saidā€¦
Thanks so much everyone.... please let me know if you have any problems with my instructions. And I'm so glad that you're liking the images! :)
Shelley saidā€¦
This is awesome Thank you for sharing your hard work and making it alot easier for those of us not computer savy!
Shells
Lindalee622 saidā€¦
Well I will be darned, but I cannot get this to download and save into my Gypsy sync files.
Grrrrrrrr, what am I doing wrong?
I feel that I am doing exactly what you have posted, but for some reason it is not showing up in my syce folder at all or on my gypsy even after many tries.
FitterTwit saidā€¦
It won't show up on your gypsy until you turn it off and then turn it back on... also, the capitalized files appear before the lower case files so be sure that your are scrolling COMPLETELY through the list. Good luck and let me know. Thanx for posting! :)
Does this work with a mac or pc b/c I have it connected to the mac and gypsy sync does not open up. Can you pls help me.
FitterTwit saidā€¦
Be sure that you have the latest version of Gypsy Synch. If you do not, you will have to completely remove the first version BEFORE uploading the newest version (being sure that you select the MAC option). You can check out installation notes here: http://www.cricut.com/gypsy/updates.aspx
I hope that helps! :)
Anonymous saidā€¦
So when I use a cut file that you shared on a project, do I reference your blog when I post my work so people know that you created the cut file? If so, how do you keep all your cut files organized so you can give proper credit?
FitterTwit saidā€¦
Anonymous...thank you for asking. Please just mention my blog. As far as my cut files being organized, they are posted in the left margin of my blog under FREE cut files. Thanx again! :)

Past 7 Days....

Wish You A Scary Christmas

Ok... this the last challenge over at The Burtonesque Dolls for 2010!!! Using any Nightmare before Christmas Images Create your best Christmas Project with that Burton Flair!ļ»æ This weeks winner will win... Three Exclusive Nightmare Before Christmas Images from Simply Betty Stamps . Oh man.... that's a HUGE prize! Head over to The Burtonesque Dolls and check out what the other awesome design team members created for inspiration. As for this one.... I KNEW I wanted to use the speckled grey cardstock for this one. I love how it resembles the granite of a gravestone. That's pretty Burtonesque, don't you think? I also found an awesome Engravers Font, but for some reason couldn't get it uploaded to my font folder. Too soon before Christmas for me to want to deal with glitches, so I just settled for an easy holiday font that I already had available. But for the record... the "Happy Holidays" in a tombstone font would have "NAILED" this project!!! Huh... I...

Gorgeous Leaves Just In Time

  So this week's Freebie Friday On A Monday projects are just in time to kick off tomorrow's Seasonal Sale with Stampin Up!  WHOO HOO!!!   November 16-18th, you can stock up and save 10% on cardstock, 15% on ink pads, and 20% on dies. Build up your collection of crafting basicsā€”and prepare for another year of top-tier projectsā€”with a steal of a deal on papercrafting products!  SHOP THE SALE: CLICK HERE! This week's party/host/hostess code is:   K2JZGAZW .   Be sure to use this code before checking out this week to get each of these three project make-n-takes for FREE!!! I mean, you might as well earn some free goodies while you're stocking up, right?!?   Okay.... so this week's first project came HIGHLY requested!  It is just the perfect gift the perfect time of year.  I mean, imagine this as a Thanksgiving table setting "Thank you for attending" gift!!!  And this is really easy to make, you could make up 5 or even 2...

WHAT!?! The Starter Kit Is Discounted?!?!

  The Starter Kit is always a great deal, right? For just $99, you get to pick out $125 in product of your choice, then enjoy a 20% + discount on all your other purchases. But,  beginning November 4, 2021, the Starter Kit is $75!!  You still pick out $125 in product, but you only pay $75! (And free shipping!) You will then not only get a discount and make 20% of purchases your friends and family make, but, youā€™ll also get to be a part of this incredible team and share in all the fun!  There are so many reasons to buy the Starter Kit! I welcome all kinds of people to my team- you can be your one and only customer, you can sell products to just a few friends and family, or, you can be a business builder. Everyone is welcome and I never pressure anyone to make more of their Starter Kit than they want to. Did you know that when you purchase the Starter Kit, you actually earn a 20% discount off EVERY purchase for the next 3 months? In fact, itā€™s actually longer than ...