How to Upload Gypsy Cut Files To Your Gypsy

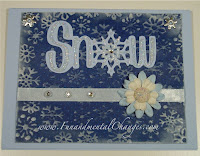
Well... Today was the big day for the Provo Craft Gypsy! Provo Craft FINALLY provided the Cricut Design Studio compatibility and now we also have the added benefit of sharing Gypsy cut files... but it was at a price. I will get to that in a later post. In honor of this occasion though, I will be adding my Gypsy cut files to my blog for everyone to use. You will find my cut files in the top right corner of my blog marked *NEW (at the top of the side bar). The instructions on how to download at the bottom of this post. I hope you all enjoy them... they've been a long time coming. The featured pic here is the "welded Snow" file. It turned out BEAUTIFUL!

DOWNLOAD INSTRUCTIONS

For those of you who already own the Gypsy, here are the instructions. There is no conversion needed because these files are only .gypsy files. To save them:
1.) Connect your gypsy to your computer, turn it on and open Gypsy Sync on your computer.

2.) Once the Gypsy Sync Program has searched for an update and found none, it will open up a file window. Click on the + next to "Gypsy" and then click on "designs". A list of files that are currently saved on your Gypsy should appear. Minimize the Gypsy Sync screen.

3.) From the side bar on this blog, click on the file you would like to download. MediaFire will open. Click download and then save.

4.) From that drop-down menu, find Gypsy Sync and highlight it as the location to save the file.

5.) Once the file is saved, maximize the Gypsy Sync Screen and see your new file saved in the list. In order to see the new file on the list in your Gypsy, you may have to power your Gypsy down and then turn it on again to see the new file added.
6.) If you do not see the file in the list, click on the "Upload Files to Gypsy" button located on the bottom lower-left of the Gypsy Sync screen on your computer. Choose the file you would like to upload from the list by clicking it once to begin the upload.


GOOD LUCK everyone and I hope you enjoy these cut files.
**Cartridges Used: Don Juan, Christmas Noel
UPDATE: As of September 2010, Gyspy Sync was replaced with Cricut Sync. For UPDATED upload instructions click HERE. Also, all of my cut files are now found in the right margin of this blog titled "FREE Gypsy Cut Files".

Comments

CathieForman said…
Wow, this is great. I love the snow that you made. I hope I can figure all this out. Thanks for sharing your files.
Magoo said…
Wonderful instructions Fitter!! Thank you for your generosity~I loved your skull card and now I have it on my Gypsy!! how awesome :): ) you rock!
Anonymous said…
This is great! I was hoping someone would be posting instructions. Thank you so much!! Lee
FitterTwit said…
Thanks so much everyone.... please let me know if you have any problems with my instructions. And I'm so glad that you're liking the images! :)
Shelley said…
This is awesome Thank you for sharing your hard work and making it alot easier for those of us not computer savy!
Shells
Lindalee622 said…
Well I will be darned, but I cannot get this to download and save into my Gypsy sync files.
Grrrrrrrr, what am I doing wrong?
I feel that I am doing exactly what you have posted, but for some reason it is not showing up in my syce folder at all or on my gypsy even after many tries.
FitterTwit said…
It won't show up on your gypsy until you turn it off and then turn it back on... also, the capitalized files appear before the lower case files so be sure that your are scrolling COMPLETELY through the list. Good luck and let me know. Thanx for posting! :)
Does this work with a mac or pc b/c I have it connected to the mac and gypsy sync does not open up. Can you pls help me.
FitterTwit said…
Be sure that you have the latest version of Gypsy Synch. If you do not, you will have to completely remove the first version BEFORE uploading the newest version (being sure that you select the MAC option). You can check out installation notes here: http://www.cricut.com/gypsy/updates.aspx
I hope that helps! :)
Anonymous said…
So when I use a cut file that you shared on a project, do I reference your blog when I post my work so people know that you created the cut file? If so, how do you keep all your cut files organized so you can give proper credit?
FitterTwit said…
Anonymous...thank you for asking. Please just mention my blog. As far as my cut files being organized, they are posted in the left margin of my blog under FREE cut files. Thanx again! :)

Past 7 Days....

Velcome To The Little Hop of HORRORS!!!

MUWAHAHAHAHAHAHAHA! So I tried to make the title sound really spooky and ran out of room to include my evil laugh... hahaha! WELCOME HOPPERS! Are you thoroughly spooked and amazed? I know I am! You already know that today is the start of our Halloween celebration with a blog hop organized by my good friend Nicole of Canadian Nickel Scrap'n . If you're currently hopping, you should be arriving here from the Fabulous Eulanda's blog ... wasn't that Caramel Corn Box AWESOME?!? If you haven't arrived from Eulanda's blog and are just now joining us, hop to the bottom of this post for details on how the blog hop works. And now for my scary good fun before you head over to Gloria's blog on the next stop of this hop. Today I've got the "Welcome" sign that I will be hanging in my foyer this Halloween. I used my Simple Frame Gypsy cut file as well as the pumpkins and faces from the Pumpkin Carvings Seasonal Cricut Cartridge (just like the one I will be g...

My Favorite Things Birthday Give-Away!!!

IT IS ON! Ok... HAPPY BIRTHDAY TO ME!!! I get to give stuff away! And not just ANY stuff.... MY FAVORITE STUFF!!!! Well, not ALL my favorite stuff, but certainly my favorites for at least ONE of my obsessions: NAILS!!! Maybe next year for my birthday I will be giving away craft supplies and exercise equipment... that would be AWESOME!!! But, this year's birthday give-away is HUGE with my favorite nail and beauty products and is open to ALL my followers. You guys are the best and deserve the best, so here is what ONE lucky winner is going to score: The Prize Haul: Konad Nail Art Stamping Set - Coraline I (I am addicted to Konad and I LOVE this set) Konad Nail art image disc - M63 (A little something extra from Kathleen... thank you) Fragrance Oil Set, types: China Rain, White Linen, Obsession (I love these for my relaxing baths) Nail Aid Nail Treatment Set including: Pink Natural Growth Therapy, Instant Wrap, Clear Liquid Bandage, Cuticle Cure, Peeling Nail Intense Repai...

Inking Pink Blog Hop

Hi Hoppers! Danielle, a.k.a. FitterTwit here.... so glad you made it!!! If you're mid-hop, you should be arriving here from Chelsea's blog . Was that a great project or what!?! If you're just joining us and need to start the hop from the beginning, you're gonna want to head over to our lovely Hop Hostess Patricia's blog to start the fun here on our VERY IMPORTANT Inking Pink Blog Hop! Here's to Breast Cancer Awareness!!! My project for this hop is a reminder card..."Remember your checkups!" What a wonderful way to say "I love you" to a dear friend or family member. Now you may not be able to see it in the pic above, but I altered The Greeting Farm's Ebony so that her tee shirt reads, "Say YES to Mammograms!" So, today I wanted to share HOW I added the words to her tee. First I printed the words as small as I could and still be able to read the message using my laser printer onto the paper that I would be using to color in my im...