Not All Pinks Are Created Equal

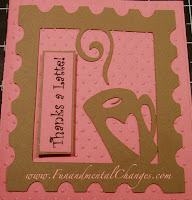
So it hit me yesterday that I never showed everyone what my Thanks a Latte card looks like, so at 12:30 this morning I loaded my paper, cut the gypsy cut file and 10 minutes later ended up with this beauty....

Only this beauty doesn't look as good in the photograph!!! What the heck!?! This pink looks coral in this pic. It's actually a pretty rose color and compliments the carmel cardstock beautifully in real life. I threw this through the Cuttlebug with my dots embossing folder. Please note, this cut file was created PRE-layers option on the Gypsy. The heart was added "after the fact" as a layer... there's also a flower and a swirl that I interchange depending on my mood. Those cute little additions are not in this original cut file but can be easily added. Here's how:

1.) After saving the original cut file, open it and find a heart or flower that you would like to add to the cup.
2.) Add the item you choose to the mat and place it where you would like it to appear on the cup.
3.) Once positioned, and while it's still highlighted blue on the screen, tap the group button (square and circle in a box icon) once and the remaining cup with frame image once (the cup with frame is already welded, so it is actually one piece already allowing the entire image to highlight with one tap of the stylus).
4.) Tap the group button again to group the heart/flower to the rest of the image and tap the "Advanced" tab located in the top right corner of the screen.
5.) Tap the weld button (icon located above the eye icon appearing as a star/circle/square in a box).
6.) Now tap the view icon (the eye) and confirm that the heart/flower turns red on the screen indicating that the Cricut will be cutting the image. Any image in grey is where the images overlapped and were welded. Those areas SHOULD NOT be cut by the Cricut.

I hope these instructions help. There is a little learning curve, but once you get it.... it's pretty easy. Now if I could just figure out my camera... at least how to keep my pinks pink! hahahahaha!

*** Cartridges Used: Gypsy Wanderings, Don Juan, Christmas Cheer

Comments

beautiful. I love the color choice.I stopped drinking coffee but after looking at this had to start :).
pam from thebugbytes
Anonymous said…
I love the card and thanks once again for sharing your talent!!

P.S. I just got the site's name, FUN and MENTAL changes! Girl, I am slow but I got it and you are right as you deliver both! LOVE IT!! Thanks!

Mercy!!!
FitterTwit said…
ahahahahaha! Mercy, you crack me up! Thanks so much to both you and BugBytes for the wonderful compliments! If you guys wanted to do that all day... I would let you! LOL!

Past 7 Days....

Gorgous Leaves Bundle Revisited

Yestday's Freebie Friday on a Monday projects were so fun and this set is SO BEAUTIFUL in it's simplicity!  It reminds me of a long-retired stamp set from Stampin Up!.  I was inspired to re-create the projects that I made with it once upon a time.  So here we go.... SIMPLE projects when you need a quick "hello" or an even quicker heartfelt sympathy card: I was DEFINITELY on a Bumblebee and Cajun Craze kick yesterday!  I can't stop/won't stop!  LOL!  To be fair... I had extra leaves die cut and didn't want anything to go to waste!  A quick speckle backdrop in Bumblebee then a quick "hello" greeting from the Biggest Wish in Cajun Craze with the Cajun Craze leaf popped up on a Basic White cardbase.  PERFECTION! Okay, as with yesterday's projects, the sentiment is from the recently retired SAB Delicate Dahlia's set, but you could use ANY sympathy sentiment you have in your stash.  Unlike in the past when I had to mask off the center rectangle...

So Lame

So over at Paper Vineyard, the challenge was to create a birthday project and it COULDN'T be a card.  I've personally been creating WAY too many cards lately so I was happy to try my hand at something new..... only I didn't. :(  Instead, I was busy preparing for last week's Cricut Swarm.  Now, while I missed creating a project specifically for our Birthday Non-Card challenge, I figured the cupcake box that I made would fit the bill PERFECTLY for a birthday-themed project.  The box also has an insert for a cupcake to fit inside.  I made it with my Cricut (cuz of the whole Cricut Swarm bit) and while I ADORE this box, I sort of had a little melt down making it and I decided that this is the last Provo Craft product I will ever buy.... let me share why (read through to find out the cartridge I used for this project)! Most of you know that I DESPISE Provo Craft.  I hate that the Cricut is a one-of-kind product that I loved....

BACK To Halloween.... WHEW!

Okay... BACK to Halloween gifting this week!  We're makin more goody boxes using The Cutest Halloween Bundle again this week, we are also featuring the tags and labels dies from the July - December 2021 Mini Catalog (lovingly dubbed "the holiday mini").  I've got to admit, this bundle really is the cutest and I'm having SOOOO much fun playing with it simply because of how easy it is to work with.  The fact that the punch ALSO punches out the images from the DSP makes this one a super-huge winner for me.  I mean.... three goody projects in under an hour!?!  That's right!  This week's Freebie Friday On A Monday was actually recorded in under 40 minutes!  SO DOABLE to get ready for Halloween gifting!  As always, the link to the free PDF with supplies used and measurements is below the last pic and if you place a $35 or more from my online store (click "Shop With Me" in the banner at the top of this blog) using this week's Host/Hostess code  GHRG...