
Ok you guys.... here is my latest and greatest Spectrum Noir project and this time I'm featuring the cuter than cute Jude At The Movies from Simply Betty Stamps along with Make It Crafty's theater background digi. I saw it done HERE and just knew it would be the perfect thing for my SMASH Book movie page. On the opposite page will be a collage of all my favorite movies. This page is just the attention getter...hahahahaha!

You see that film strip at the top of the page? Well I'm going to go over how I made that so that you can do it too!!! But first....
 You need to start with an image. Here's the image that was colored using Spectrum Noir pens
Step 1: Color your image and take a picture of the completed project. Using photo editing software, convert the completed image to black and white.
Step 2: Scan a 35 mm film strip. If you don't have access to a scanner, you can find local pharmacies or office supply stores that may provide that service for you. You can also try searching for a film strip template online. Be sure that the file is saved as a JPG.
Step 3: Again, using photo editing software add your black and white picture to the film strip (this project features 4 copies to complete the whole film strip). Once the filmstrip is complete, flip the image like you would to create a mirror image.

Step 4: Using a laserjet printer, print flipped image onto regular copy paper (the thinner, the better).
Step 5: Cover film strip using clear packing tape. The picture below shows the tape being adhered after the image was trimmed. It is advised that you attach the tape PRIOR to trimming as the packing tape has static electricity causing the small trimmed paper to move as the tape is being applied. A second attempt applying the tape before trimming was MUCH more successful as the large piece of paper doesn't move as much.

Step 6: Trim the film strip and soak in warm water for approximately 3-5 minutes.

Step 7: Using fingers, "smudge" away the wet paper. It removes easily to reveal a realistic film strip.
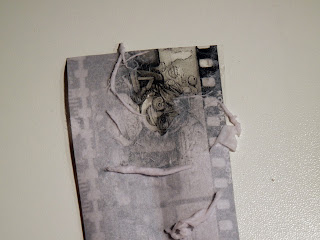
OPTIONAL STEP: Using a rubber adhesive eraser, scrub away some of the exposed laserjet ink to create an aged and grainy film strip.

And there you have it.... an easy film strip using a completed Spectrum Noir project!!! It was really fun and I'm now excited to collage all my movie pics. I say that like I have any! HAHAHAHAH! Heck, I don't even have my favorite movie list together yet. Time to get crackin!!!
Until next time.

You see that film strip at the top of the page? Well I'm going to go over how I made that so that you can do it too!!! But first....

- FS1,TN2 and TN3 for the skin
- TN2, EB3 and EB8 for hair
- DR7, DR6, CR10, BGR2, BGR5, IG1 and IG3 for the theater
- CG2, CG4, DG3, CT1, CT2, OR1, OR2, BT3, BT7, BT8, DR6, DR7 and CR10 for the antennae, drinks and popcorn
- IG1, IG3, IG7, and IG10 for shirt, shoes and cup lids
- BT7, BT9 and TB1 for the jeans
- White gel pen was added to the glasses to give them a bit of a shine.
Step 1: Color your image and take a picture of the completed project. Using photo editing software, convert the completed image to black and white.
Step 2: Scan a 35 mm film strip. If you don't have access to a scanner, you can find local pharmacies or office supply stores that may provide that service for you. You can also try searching for a film strip template online. Be sure that the file is saved as a JPG.
Step 3: Again, using photo editing software add your black and white picture to the film strip (this project features 4 copies to complete the whole film strip). Once the filmstrip is complete, flip the image like you would to create a mirror image.

Step 4: Using a laserjet printer, print flipped image onto regular copy paper (the thinner, the better).
Step 5: Cover film strip using clear packing tape. The picture below shows the tape being adhered after the image was trimmed. It is advised that you attach the tape PRIOR to trimming as the packing tape has static electricity causing the small trimmed paper to move as the tape is being applied. A second attempt applying the tape before trimming was MUCH more successful as the large piece of paper doesn't move as much.

Step 6: Trim the film strip and soak in warm water for approximately 3-5 minutes.

Step 7: Using fingers, "smudge" away the wet paper. It removes easily to reveal a realistic film strip.

OPTIONAL STEP: Using a rubber adhesive eraser, scrub away some of the exposed laserjet ink to create an aged and grainy film strip.

And there you have it.... an easy film strip using a completed Spectrum Noir project!!! It was really fun and I'm now excited to collage all my movie pics. I say that like I have any! HAHAHAHAH! Heck, I don't even have my favorite movie list together yet. Time to get crackin!!!
Until next time.
Comments